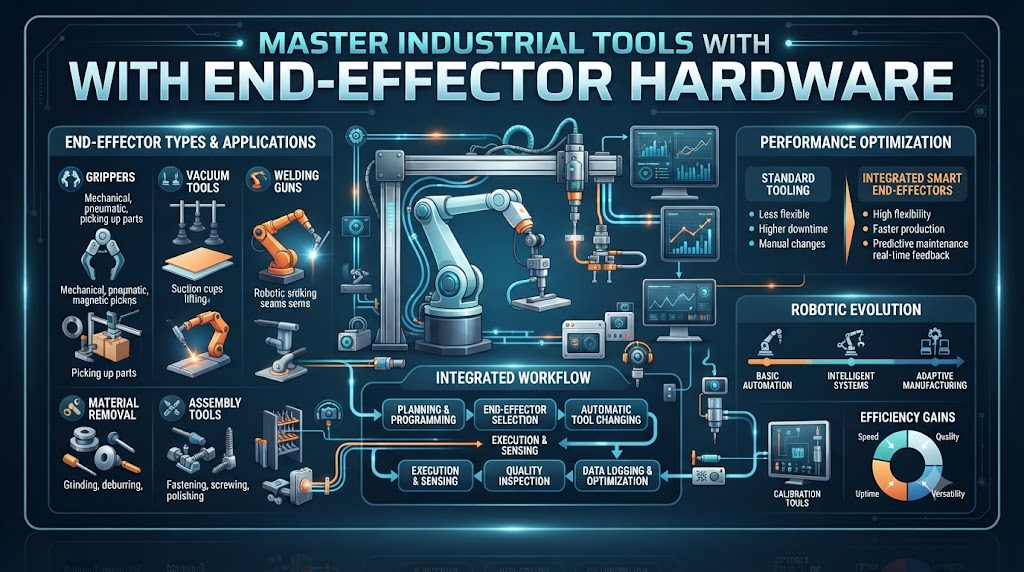
Robot arms get all the glory on factory floors. They move fast and look cool. But a robot arm without the right tool at the end is just metal waving in the air.
That working tool is called an end-effector. It is the part that actually grips, welds, paints, or glues parts together. If your tool fails, your whole line stops.
Getting this part right is the key to safe and fast work. You can check out expert tools and tips at RobotsOps.com to see how top teams build their setups.
Let us look at how you can pick, set up, and run the best end-effector hardware for your needs today.
What Is End-Effector Hardware?
An end-effector is the device attached to the very end of a robot arm. It interacts directly with the physical world.
Think of it like a human hand. The robot arm is your arm and shoulder. The end-effector is your hand and fingers, or the wrench you hold in your hand.
Without it, the robot cannot touch or move anything. Different jobs need very different tools. A car factory needs a heavy suction cup to lift glass. A food plant needs a soft gripper to hold fresh fruit.
Why Choosing the Right Tool Matters
Picking the wrong tool costs you time and money. If a gripper is too weak, parts drop and break. If it is too strong, it crushes fragile items.
You must match the tool to your exact task. This keeps your work safe and fast. Good hardware also lasts longer. It needs fewer repairs and saves you from sudden line stops.
Smart teams spend time testing tools before buying them. A small upfront test prevents huge headaches down the road.
Mechanical Grippers Explained
Mechanical grippers use physical fingers to hold objects. They act just like human hands. Most models have two or three fingers.
They use motors or air pressure to open and close. You use them to pick up metal blocks, boxes, and solid parts. They give you a very strong and secure hold.
The downside is that they can scratch soft surfaces. You must use rubber pads if you handle delicate items.
Vacuum and Suction Tools
Vacuum tools use air suction to lift flat and smooth items. Think of large sheets of glass or cardboard boxes.
Rubber cups press against the object and suck out the air. This creates a tight seal that holds the item fast.
They are fast and very light. But they fail if the surface is dusty or has holes in it. You need clean surfaces for suction to work well.
Magnetic and Special Grippers
Magnetic grippers use powerful magnets to lift steel and iron parts. They do not need moving fingers or air hoses.
This makes them simple and very reliable. They grab steel sheets instantly and drop them when you turn the magnet off.
Special tools also exist for welding, painting, and gluing. Each tool is built for one specific job on the factory floor.
| Tool Type | Best Used For | Main Advantage | Main Disadvantage |
| Mechanical Gripper | Solid parts, boxes | Strong hold | Can scratch items |
| Vacuum Cup | Glass, sheet metal | Fast and light | Fails on rough surfaces |
| Magnetic Tool | Steel plates | Simple and fast | Only works on iron/steel |
| Soft Gripper | Food, fragile items | Gentle touch | Lower weight limit |
Power Sources: Electric vs. Pneumatic
Your end-effector needs power to move. Most tools use either electricity or compressed air.
Pneumatic tools use air pressure. They are fast, cheap, and very strong. But they need air lines and compressors running all the time.
Electric tools use small motors inside the tool. They give you precise control over grip strength and finger position. They cost more, but they save energy and space.
Sensors and Feedback Systems
Modern tools have built-in sensors. These sensors tell the robot if an item is slipping or dropping.
If a part starts to slip, the robot can squeeze harder right away. This stops accidents before they happen.
Sensors also check if a part is present. If the tool is empty, the robot knows not to move on to the next step.
Real-World Stories About Tool Failures and Fixes
- A car parts plant used old vacuum cups that lost air pressure every time the compressor stuttered, causing heavy steel doors to drop onto the concrete floor until the team installed backup air tanks.
- A food packaging line suffered constant jams when hard mechanical fingers crushed delicate pastries, which was solved by switching to soft pneumatic rubber grippers with gentle pressure limits.
- A warehouse picking robot dropped fragile glass bottles because dust built up on the suction pads, leading to a new daily cleaning rule that stopped all drops.
- A metal shop had its magnetic grippers fail because stray metal chips stuck to the faces, so they added self-cleaning shields to keep the magnets clear.
- A smartphone assembly line lost hours of work because electric gripper motors overheated from fast cycles, which they fixed by programming brief rest pauses between picks.
- A wood mill struggled with sawdust blocking pneumatic valves until they added protective air filters to keep the control lines clean and dry.
- A logistics firm noticed boxes sliding out of two-finger grippers during sharp turns, so they added high-friction rubber tape to the finger tips for a secure hold.
- A chemical plant had air lines snap when robot arms twisted too far, prompting workers to use flexible swivel joints that let the hoses spin freely.
- A electronics maker faced high scrap rates from static shocks until they grounded all their end-effector tool faces with anti-static straps.
- A heavy parts warehouse suffered tool damage when robots crashed into walls due to bad sensor wiring, which they fixed by adding sturdy rubber bumper guards around the tools.
Common Mistakes and Pitfalls
- Mistake: Picking a tool that is too heavy for the robot arm. Solution: Always check the payload limit of your robot arm before buying any tool.
- Mistake: Ignoring air quality in pneumatic setups. Solution: Install clean air dryers and filters to keep moisture out of your valves.
- Mistake: Using smooth fingers on oily metal parts. Solution: Use textured or rubber-coated fingers to stop parts from sliding around.
- Mistake: Forgetting to check sensor wiring during setup. Solution: Test every sensor signal manually before running the robot at full speed.
- Mistake: Running electric motors past their duty cycle limit. Solution: Follow maker guidelines on rest times to stop motors from burning out.
- Mistake: Ignoring regular wear on rubber suction cups. Solution: Inspect and replace worn rubber parts every week to keep seals tight.
- Mistake: Setting grip pressure too high for fragile items. Solution: Start with low pressure tests and turn it up slowly until items stay secure.
- Mistake: Failing to protect cables from moving parts. Solution: Use zip ties and protective sleeves to keep wires away from sharp pinch points.
- Mistake: Buying custom tools when standard parts work fine. Solution: Look at modular off-the-shelf parts first to save money and lead time.
- Mistake: Skipping safety checks after tool changes. Solution: Run a slow test cycle every time you swap out an end-effector tool.
Step-by-Step Implementation Roadmap
- List the exact size, weight, and material of every part your robot needs to lift.
- Choose your power source based on your factory setup, picking air or electric power.
- Select your tool type, such as a mechanical gripper, vacuum cup, or magnetic pad.
- Check the robot arm payload limit to make sure it can carry the tool safely.
- Order modular mounting brackets that match your specific robot arm model.
- Connect your power lines, air hoses, and sensor wires carefully to the tool.
- Program the robot controller to send open and close signals at the right spots.
- Test the grip force on sample parts at slow speeds to ensure a secure hold.
- Add safety guards, warning labels, and emergency stop tests to your work cell.
- Run a full trial shift and check for any dropped parts or loose fittings.
Frequently Asked Questions
1. What is an end-effector?
An end-effector is the tool attached to the end of a robot arm that interacts directly with work parts.
2. How do I pick the right tool?
Match the tool type, weight limit, and grip method to the exact size and material of your parts.
3. Are electric or pneumatic tools better?
Pneumatic tools are fast and cheap, while electric tools offer precise control over grip force.
4. Why do vacuum cups drop parts?
They usually drop parts if the surface is dusty, wet, or has holes that break the air seal.
5. How often should I check my gripper pads?
Inspect and clean your gripper pads and rubber suction cups at least once every single week.
6. Can one robot use multiple tools?
Yes, many modern setups use quick-change plates to swap tools automatically during work cycles.
7. What causes electric grippers to overheat?
Running them too fast without rest breaks can cause the internal motors to get too hot.
8. How do sensors help end-effectors?
Sensors detect slipping parts and verify if an item is securely held before the robot moves.
9. What is payload limit?
Payload limit is the maximum combined weight of the tool and the part that the robot arm can safely lift.
10. Where can I find more setup guides?
You can find expert guides and helpful technical resources directly on RobotsOps.com.
Final Recommendation and Next Steps
Start small by testing a single modular tool on your busiest workstation. Measure your part drop rate and cycle times before and after the setup. Once you see what works, train your team on daily checks and basic cleaning rules. Visit RobotsOps.com to grab helpful checklist templates and keep your automation line running smoothly every single day.
